Introduction
Scope
The following is a user guide for Microsoft Teams users on how to use Implicit for Teams.
Trademarks
Implicit, the Implicit Logo, and Implicit FrontEnd, Implicit for Outlook, Implicit for Teams and combinations thereof are trademarks of Implicit Inc.
Microsoft, Microsoft Office, Microsoft Outlook, Microsoft Teams, Microsoft 365, Office 365, and Windows are registered trademarks of Microsoft Corporation.
SugarCRM is a registered trademark of SugarCRM Inc.
SuiteCRM is a registered trademark of SalesAgility Ltd.
Other product names used in this publication are for identification purposes only and may be trademarks of their respective companies.
Disclaimer
The contents of this document are provided in connection with Implicit Inc. (“IMPLICIT”) and Implicit for Teams product. IMPLICIT makes no representations or warranties with respect to the accuracy or completeness of the contents of this publication and reserves the right to make changes to specifications and product descriptions at any time without notice. No license, whether express, implied, arising by estoppel, or otherwise, to any intellectual property rights are granted by this publication. Except as set forth in Implicit FrontEnd License Agreement, IMPLICIT assumes no liability whatsoever,
and disclaims any express or implied warranty, relating to its products including, but not limited to, the implied warranty of merchantability, fitness for a particular purpose, or infringement of any intellectual property right. IMPLICIT’s products are not designed, intended, authorized or warranted for use as components in applications intended to support or sustain life, or in any other application in which the failure of IMPLCIT’s product could create a situation where personal injury, death, or severe property or environmental damage may occur. IMPLICIT reserves the right to discontinue or make changes to its products at any time without notice.
Supported Platforms
Microsoft Teams
- Microsoft Teams on Windows (Windows 11, Windows 10, Windows 8.1, Windows Server 2019, Windows Server 2016, Windows Server 2012 R2)
- Microsoft Teams on Mac (macOS 10.10 or later).
- Microsoft Teams Online (Microsoft Edge, Google Chrome, and Safari).
- iOS and Android
CRM
- SugarCRM and SuiteCRM
Prerequisites
Verifying Implicit for Teams is Installed
Before you can start using Implicit for Teams, your admin needs to install the app on your organization’s Microsoft 365 account. Please see Implicit for Teams Admin Installation Guide.
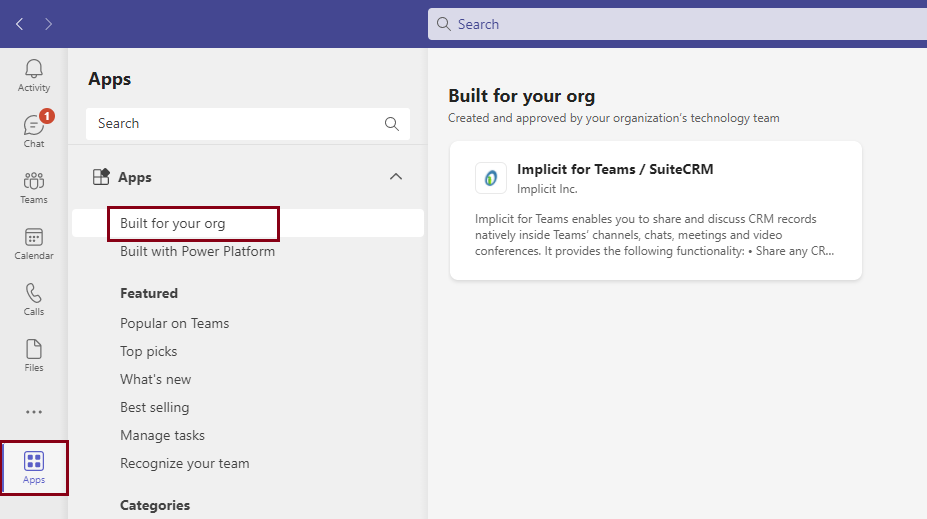
To check if Implicit for Teams is installed for your organization, sign in to Microsoft Teams. If you are already signed in, please sign out and sign in again.
Click ‘Apps’ and select ‘Built for your Org’. If Implicit for Teams installed it will show up on the right-side pane.
Verifying that Implicit Module is installed on CRM Server
To be able to save conversations and approval sessions as collaboration logs on the CRM, Implicit Extension Package (custom module) needs to be installed on your CRM. Prior to using Implicit for teams, please verify with your CRM admin that the custom module is installed. For more information see: Installing Implicit Extension Package on the CRM Server.
Adding Implicit for Teams to Teams’ Channels
You can add ‘Implicit for Teams’ to any Teams channel that you share with your team members. This allows you to share and discuss CRM content with other CRM users inside Teams. When you select a CRM record to open inside Teams, that record becomes automatically visible to any CRM user who is a member of that channel and has permissions to access that CRM record.
You can also add Implicit for Teams to chats, or posts using the same method described below.
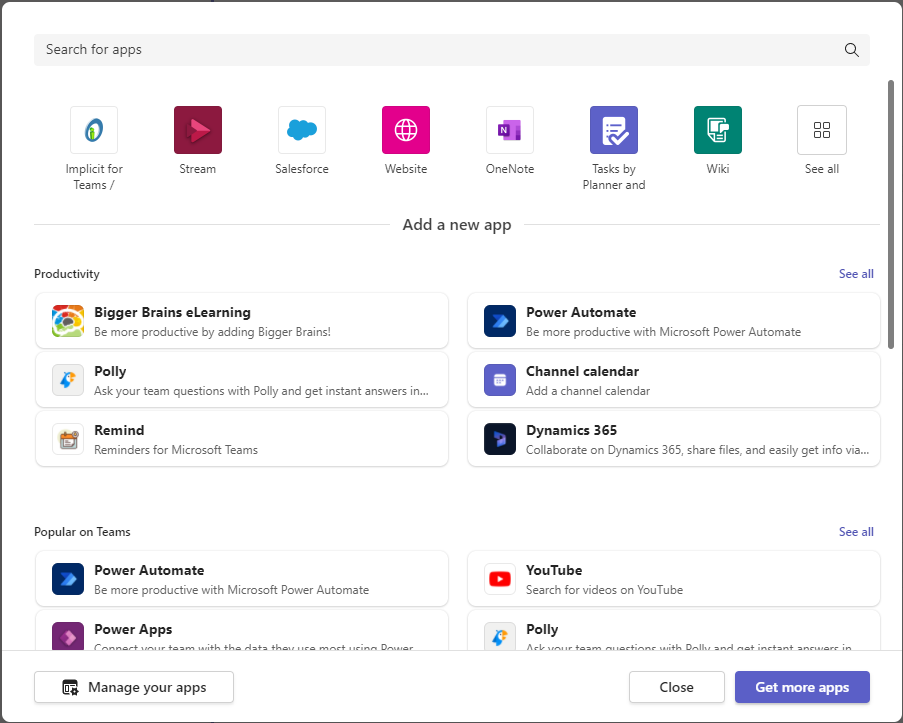
To add an Implicit tab to a Teams’ channel, simply click the ‘+’ button on the top toolbar.
Teams will prompt you to enter the name of the Teams app that you would like to add as a new tab. Start typing ‘Implicit’ and Teams will find the app and allow you to select it.
Note: Teams shows the most recently used apps, so when you start using the app frequently, you’ll find it at the top section.
Upon the first launch or when you are not logged in to Implicit for Teams, you’ll be prompted to login:
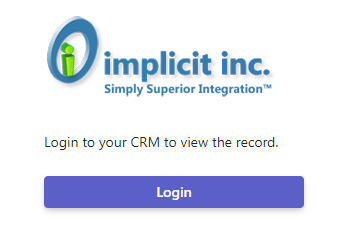
Followed by a login screen:

The login screen prompts you for the following information:
- License Key – Upon the first login, enter your implicit license key.
- CRM address – The URL to the root folder of the CRM (the same URL that you specify to login to the CRM via the web browser). Make sure to specify HTTPS, e.g.: https://implicit.sugarondemand.com
Note: Microsoft Teams requires all apps to use HTTPS.
- User Credentials – Enter your CRM credentials (username and password that you use to login to your CRM).
- Terms of Service and Privacy Policy – Please review Implicit’s Terms of Service and Privacy Policy and if you accept both check the box indicating that you have reviewed and agree. To use ‘Implicit for Teams’, you also need to agree to have your name, email address and CRM username sent to Implicit and to be associated with your implicit license. If you don’t agree, please click the X button to close the dialog and cancel the login.
When you’re ready click ‘Login’. Next, you’ll be prompted to select the CRM record that you would like to share with your team:
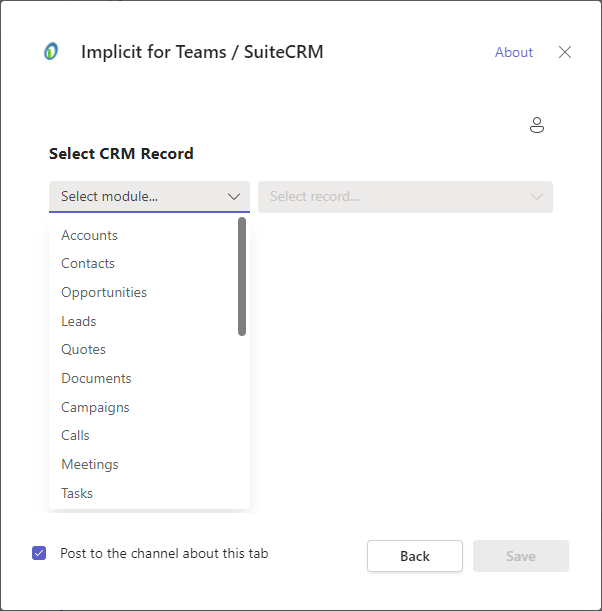
Select the module type first and then start typing the name of the record you’re looking for.
Note: The drop down will initially display the first 50 records and will narrow down the list progressively as you start typing the name of the record and will auto-complete the record name when a match is found.
Once you select the CRM record, click ‘Save’.
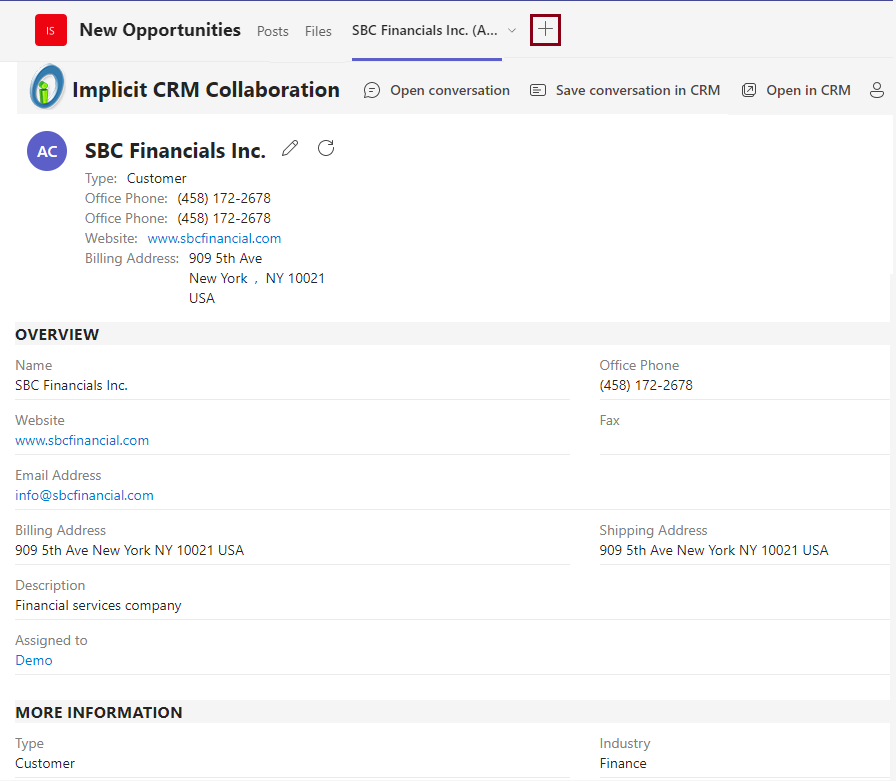
If you have permission to access the record, Implicit for Teams will display it in the new tab:
Note: When you add a CRM record to the channel, it becomes visible to all team members of that channel who have permissions to access it.
Removing Implicit for Teams Tab from a channel
To remove the tab, click the drop-down arrow next to the CRM record name and select Remove.

This will just remove the tab from Teams. It will not remove the record from the CRM.
Note: if you have edited the CRM record and wish to save these changes back to the CRM, make sure to click ‘Save’ before removing the tab.
Working with CRM records inside Teams
Viewing CRM Records
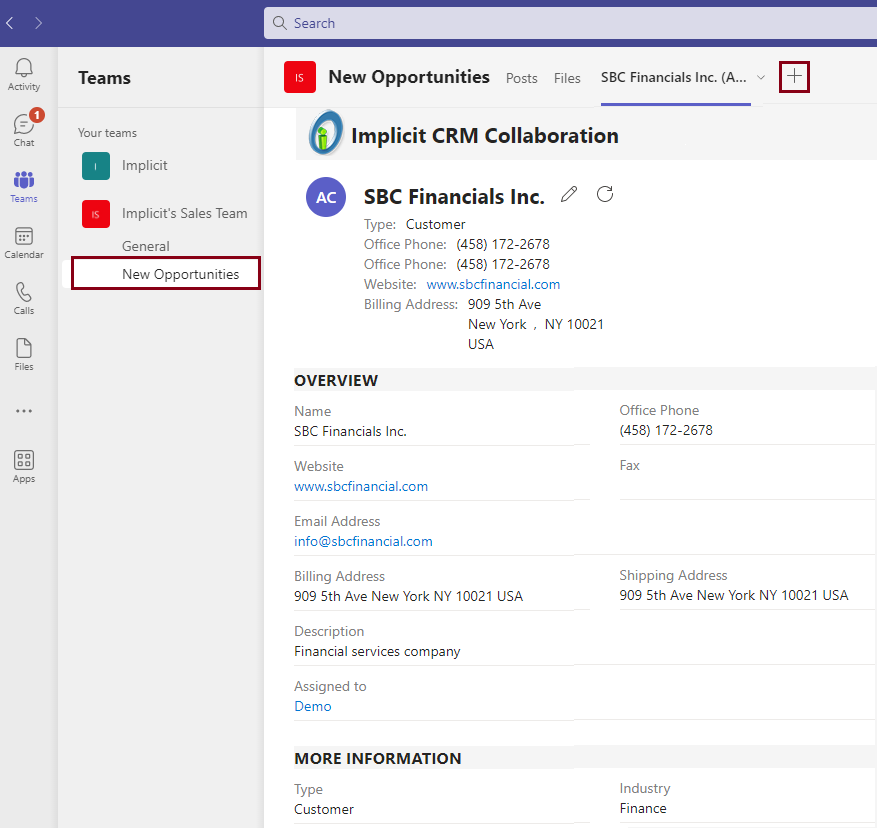
The CRM record view includes the name of the record with an icon indicating its type and the key attributes (fields) to allow you to get a quick summary of the record.
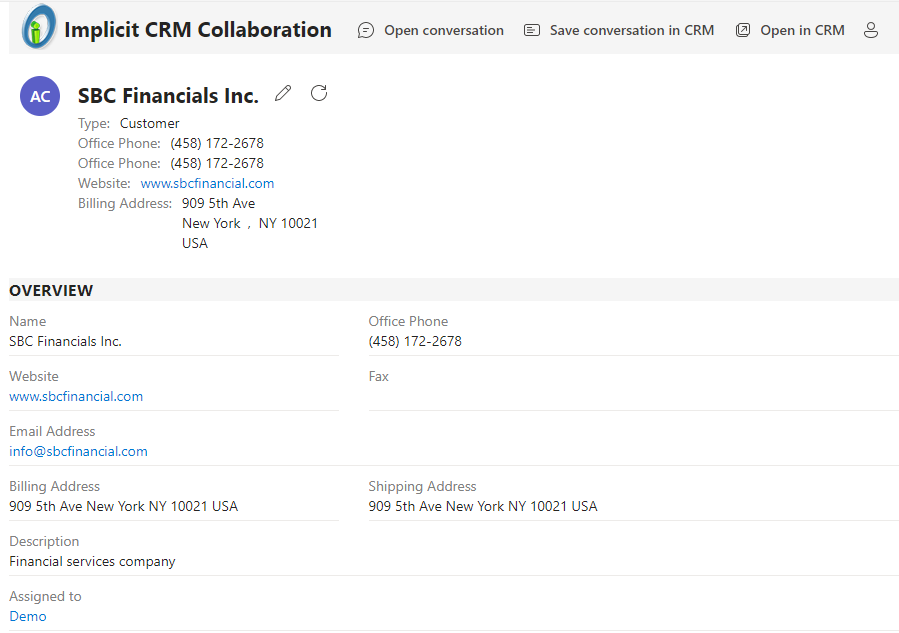 CRM records inside Teams are displayed in their native CRM format. The fields are organized in the same exact order as when working via a browser including any custom fields and custom modules that you’ve defined in the CRM.
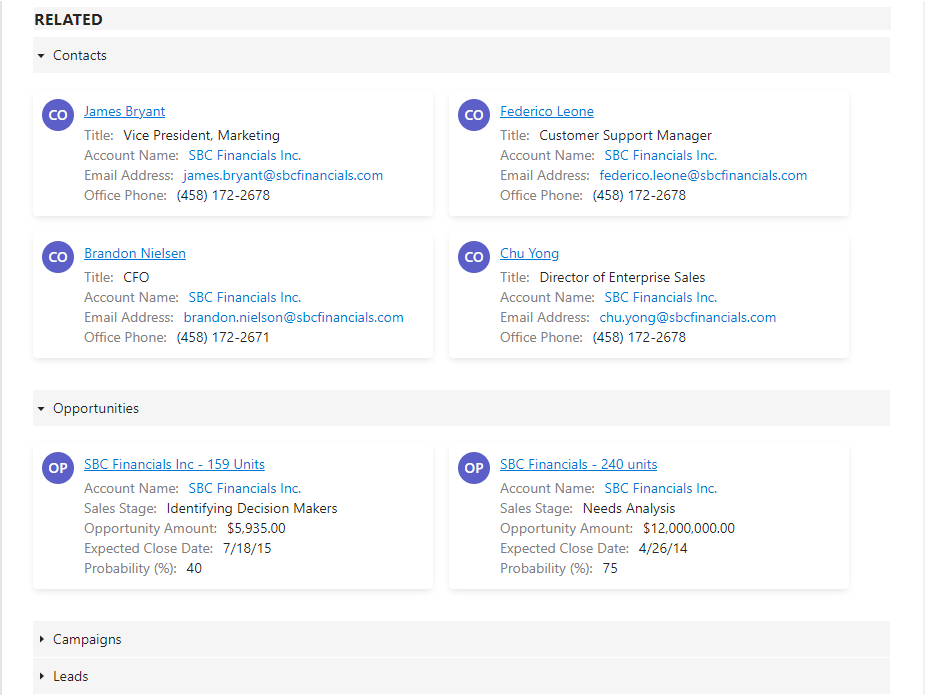
The ‘Related’ section includes all the related CRM records, each with its key attributes, arranged in the form of cards.
Collaborating, Discussing and Updating CRM Records
To discuss the CRM record with your team members, click the ‘Open Conversation’ button. The conversation will open on the right-hand side pane.
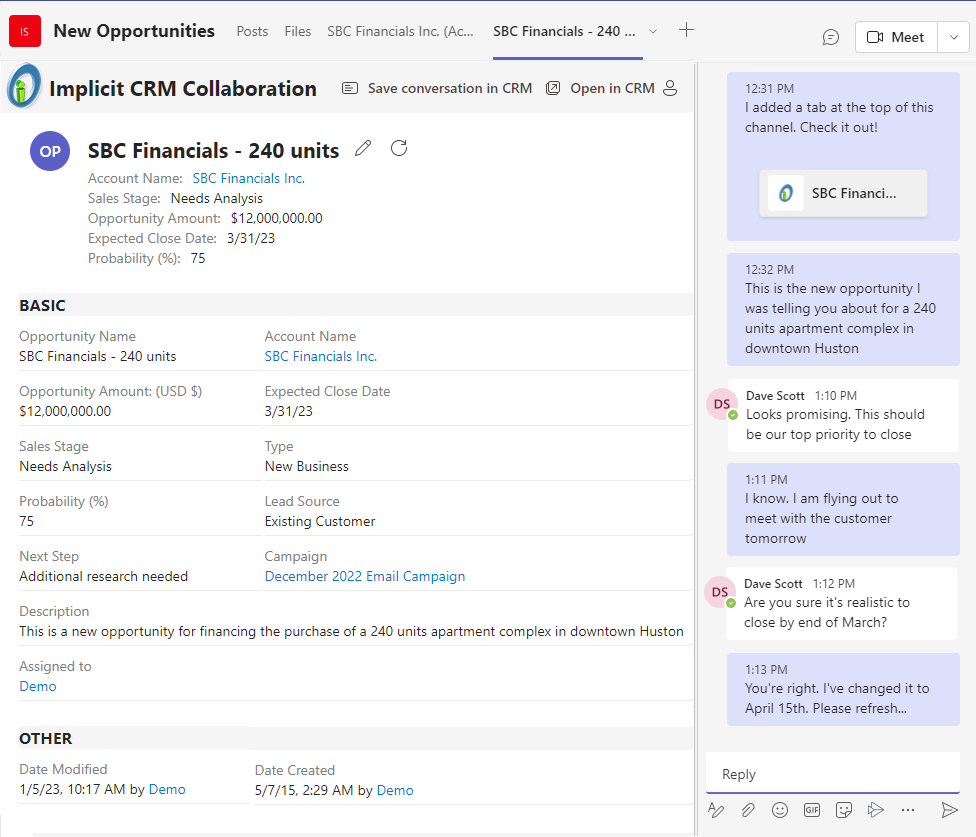
Team members who have access to the CRM record, can view the content and participate in the conversation. Those members with permissions to modify the record, can edit and update it inside Teams. Once a record has been updated by any of the team members, you can refresh the record by clicking the ‘Refresh’ button next to the record’s name.
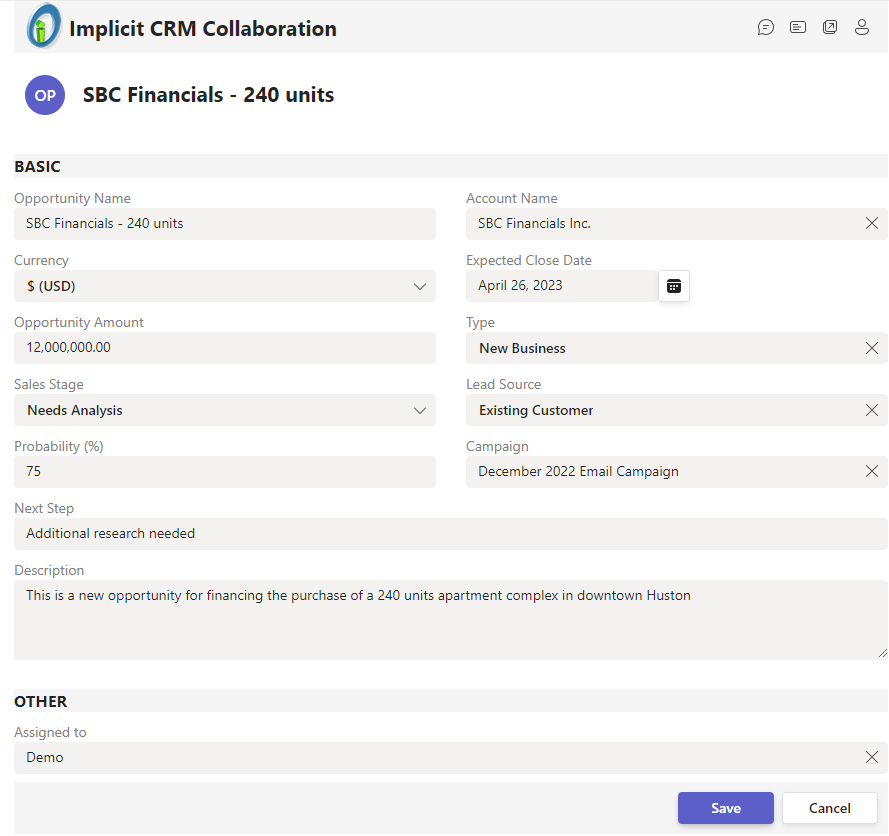
To edit a record, click the ‘pencil’ icon next to the record’s name. This will open the record for editing in the same format as when you edit it on the CRM (in the browser).
Saving the conversation in the CRM
At any time of the discussion, you can save the conversation and generate a collaboration record in the CRM.
Note: For the purpose of this document, we use the terms “Conversation”, “Discussion” or “Collaboration” interchangeably.
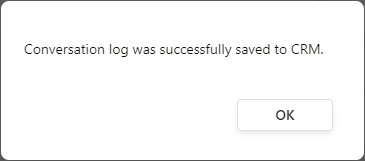
One collaboration log will be created per conversation. If you save multiple times, it will continue updating the log until you close the Implicit tab. When the log is successfully saved in the CRM, you will be notified:
Viewing the Collaboration Log in the CRM
When the Implicit Extension Package is installed on the CRM, a new type of sub-panel is added to CRM records. This sub-panel will display all collaboration and approval sessions, as shown below

Click the collaboration name to open the collaboration and view a sequential log of all the chat messages. This will enable you to review the conversation quickly and easily. The screenshot below shows an example of such a log:

To view the log from Teams, click on ‘Open in CRM’, scroll down to the ‘Implicit Collaborations’ sub-panel and open the collaboration.
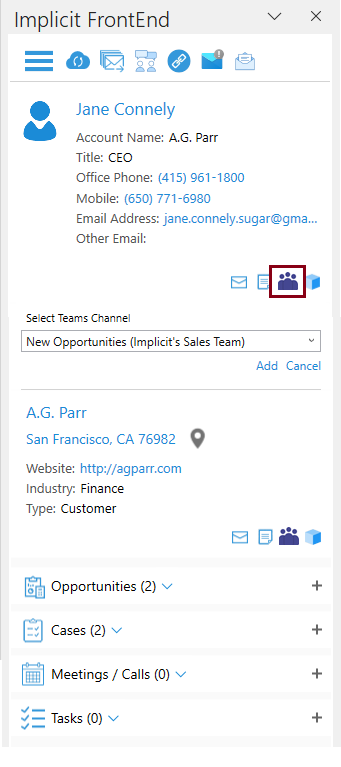
You can share CRM records directly from the CRM by opening a record and selecting “Actions” in SuiteCRM or the blue drop-down arrow in SugarCRM.

You will be prompted to login to Teams and select the Teams channel on which to share the CRM record. If you’re no logged in to Teams, you’ll be prompted to login first, followed by the Teams channel selection dialog:

After selecting the channel and clicking Add, Implicit will launch Teams App and take you directly to the new tab you selected.
Note: To share CRM records from Outlook, you need to have both Implicit for Outlook and Implicit for Teams installed.
If you are using Implicit for Outlook, you can select the record to share and open in Teams directly from Outlook. Simply click the “Share via Teams” button next to the record on the side-panel. This enables you to easily share with your team, CRM records that are related to an email that you received or about to send to a customer.
You’ll be prompted to select the Teams channel where you would like to share that record. If Microsoft Teams is not running, implicit will launch it and open the record on the selected channel.
Requesting Approval
Overview
A very important and useful feature of collaboration is the ability to request approval in real-time via Teams. There are many situations where you may need to get your sales manager approval before communicating back to a customer. You may, for example, need to get approval before offering a certain discount or before sending a quote to a customer. Implicit for Teams allows you to request approval via Teams and capture the Teams conversation with your sales manager or other CRM users, related to this approval request, including when and by whom the request was approved or declined, and archive all this information as an approval log to the corresponding CRM record. The approval log will include all the messages as well as an audit trail of each approver approving or declining the request.
Requesting Approval via Teams
To request approval click the ‘…’ button on the bottom of the conversation pane:

Teams will prompt you to select the app. If you don’t find Implicit in the ‘Recent’ list, start tying “Implicit” and Teams will find and activate it.

Alternatively, you can start typing “@Implicit” in the chat text box, and Teams will auto -complete, display the full name of the app. Select ‘+ Request Approval’:

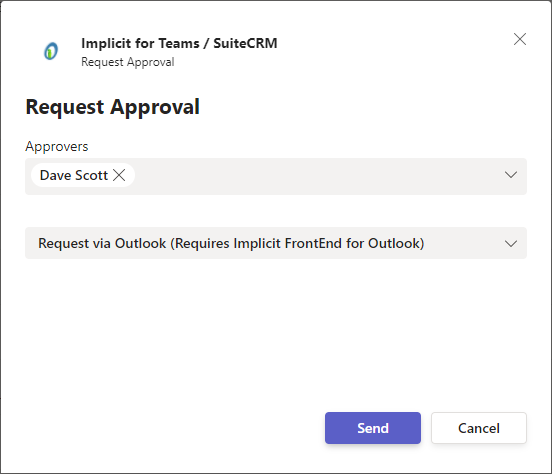
Upon selecting ‘Request Approval’, you’ll be prompted to select one or more approvers from the list of your team members:
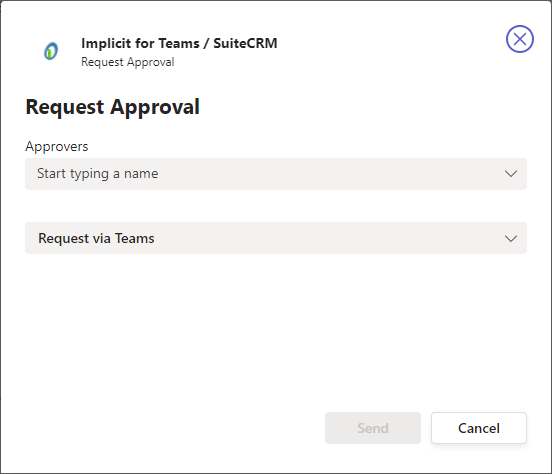
When you’re done, click ‘Send’.
Upon sending the approval request, it will be added to the conversation window as shown below:
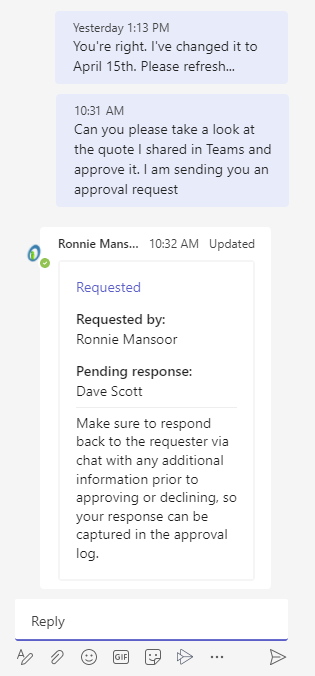
Each of the approvers, will receive the request and view it in the conversation window, along with the buttons to ‘Approve’ or ‘Decline’.
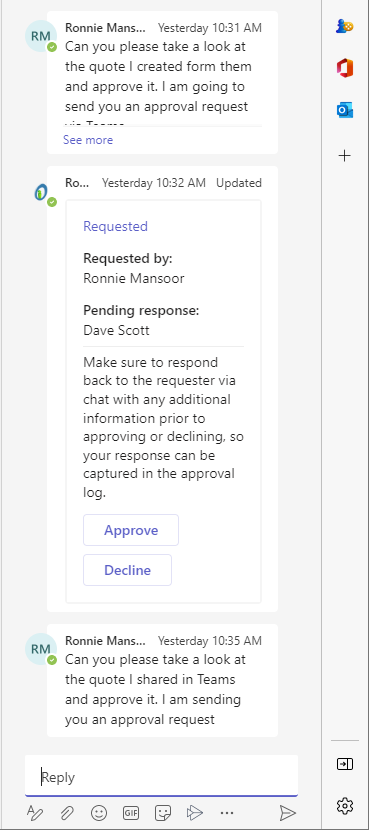
Note: we recommend that you respond back to the requester with any questions or comments explaining your decision in the conversation pane before selecting ‘Approve’ or ‘Decline’ to ensure that your response is included in the approval log that would be saved to the CRM.
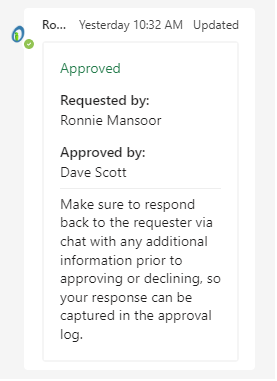
The requester will be notified of the approval/decline decision in the conversation pane:
If your request is declined, you can modify the request or provide additional information and request again. After you receive the approval/decline, make sure to click ‘Save Conversation in CRM’. Implicit for Teams will retrieve the complete conversation including any approval request and responses from the approvers and generate an approval log under the related record in the CRM. The approval log will show up under the Collaborations sub-panel as shown below:

Click on the approval record to open.
Requesting Approval via Outlook
Note: This functionality requires you to have “Implicit for Outlook” add-in installed.
If your sales manager or any of the approvers is not available to join a real-time discussion via Teams, you can trigger the same approval process via Outlook. Implicit for Teams allows you to send an approval request email via Outlook. This will trigger the approval request mechanism that Implicit for Outlook provides. At any time during the discussion in Teams, you can request an approval via Outlook. An email will be generated with all the information about the related CRM record so that the approver would receive all the information necessary to approve your request. You’ll be able to explain your request in the email. Prior to sending the email, Implicit will capture the Teams conversation to allow the approvers to review the Teams discussion that preceded the request (if any) in the approval log in the CRM prior to approving /declining the request.
Once your request is approved or declined via outlook, the approval log will be updated to include the email correspondence and the approval decision, so that an accurate and complete audit trail is saved in the CRM.
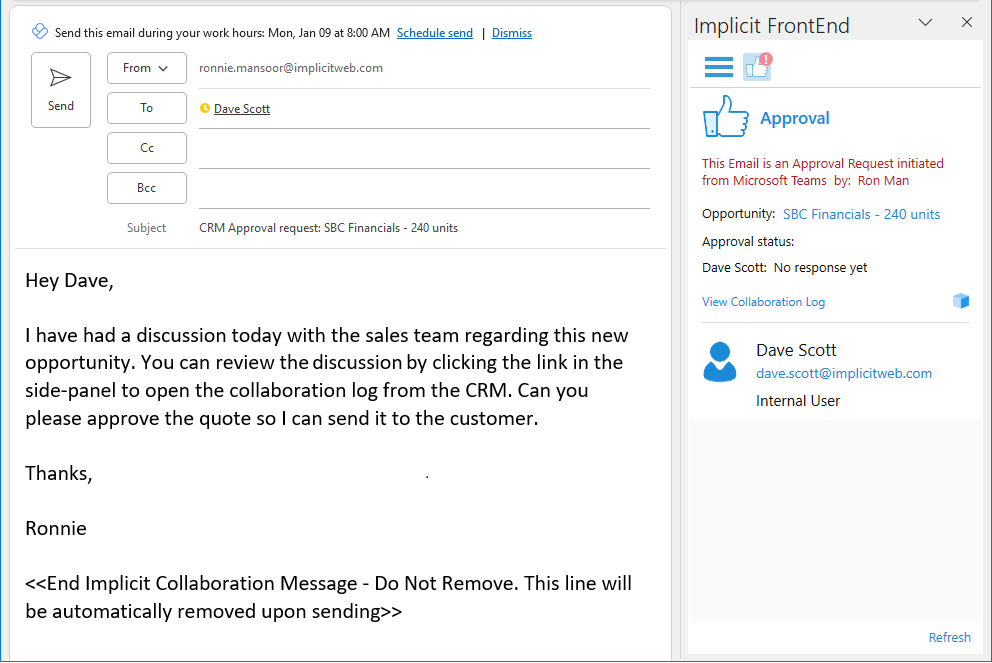
To request an approval via Outlook, follow the same steps as described previously and when prompted to select approvers, select “Select via Outlook”
Upon clicking done, Implicit will automatically save the conversation and generate an approval log in the CRM. It will then switch to Outlook and open the approval request compose email with all the related CRM information already set. You can then enter your message and click ‘Send’
Implicit for Outlook will continue to track the approval request and responses and update the approval log in the CRM and in Outlook.
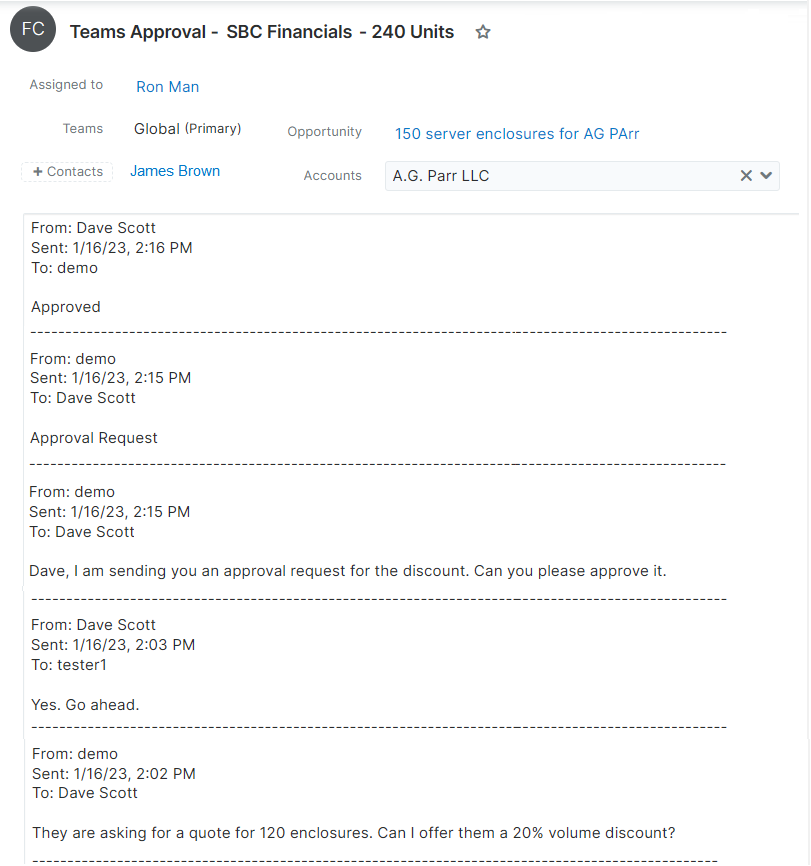
Viewing the Approval Logs in Outlook
The approval email thread will also be visible in Outlook as shown below:
The log is a sequential list ordered by time and grouped by collaboration threads. It contains the sender’s name (From), list of recipients (To), and date.
Each CRM record can have multiple collaboration threads simultaneously or one after another. When there are multiple threads, the collaboration log will group the emails under the Email subject of each collaboration thread. Each collaboration thread can be collapsed or expanded by clicking on its header (subject).
The collaboration log continues as long as the email discussion continues and will collect all the emails within that discussion.
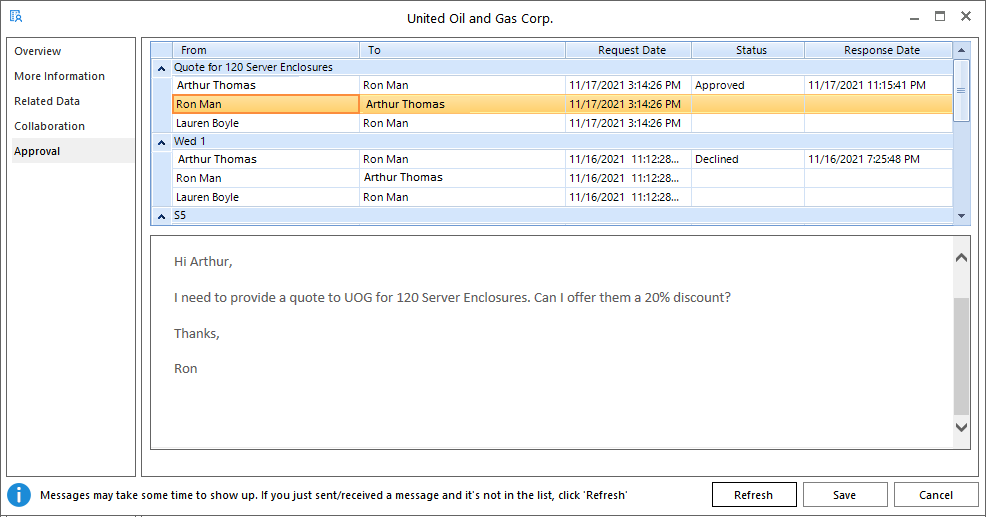
Viewing the Approval Logs in the CRM
To access the approval log in the CRM, open the record that the approval is related to and scroll down to the collaborations sub-panel. Sort by date, or by the name of the initiator and click to open the collaboration record.
Clarification: To clarify the terms we use – The record type is ‘collaboration record’. An approval is a specific case of collaboration. When the collaboration contains an approval request and response, the log that is generated is referred to as an ‘approval log’.
Teams Meetings Integration
Adding Implicit Tabs when Scheduling a Meeting in Teams
When you schedule a meeting in Teams, you can add Implicit tabs in preparation for the meeting with the customer or with your own team members. Select the meeting in your calendar and click ‘Edit’. The meeting opens up in edit mode. Click the + button to add a tab just as you do when adding an Implicit tab to a Teams’ Channel.
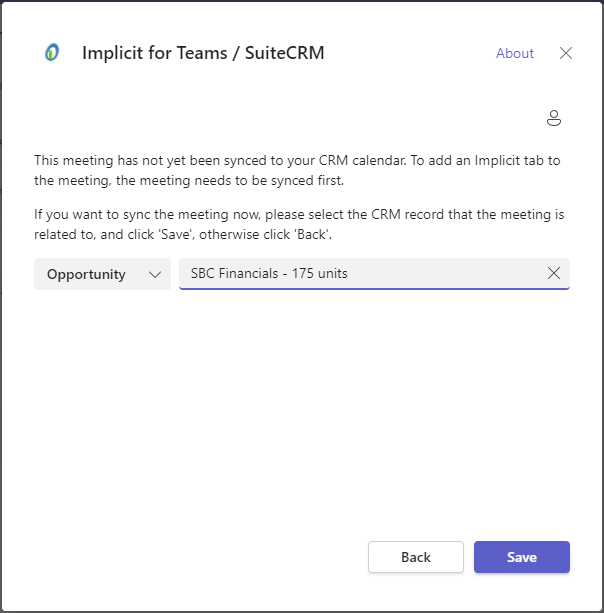
If the meeting has just been scheduled and not synced to the CRM yet, Implicit will notify you that the meeting record is not found in the CRM and prompt you to sync the meeting at that time. You will also be prompted to select the record that the meeting is related to such as contact, account, opportunity etc.
Upon syncing the meeting or if the meeting has already been synced to the CRM, Implicit will add two new tabs:
-
- The meeting record – To allow you to add your notes during the meeting and in order for Implicit to save the meetings transcripts, attendance report and a link to the recording.
- The related CRM record – To allow you to review the relevant CRM information prior to, and during the meeting. The CRM information will be visible only to you and your team members but not to any external participant.
Adding Implicit Tabs to a Live Meeting
If you have added Implicit tabs to the meeting prior to the start of the meeting, they will be visible in the live meeting as well. In a live meeting, the information is visible as a side panel as shown below:
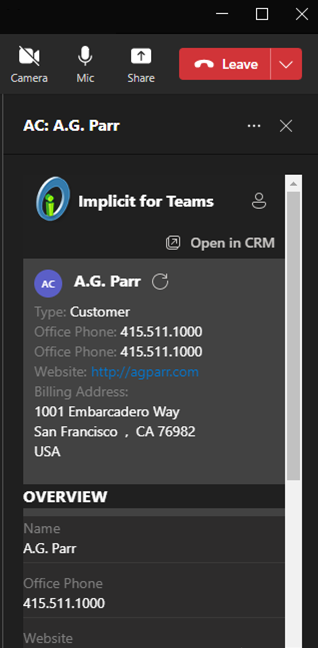
Note: The side-panel with the CRM information is visible only to internal Teams user, not to any external participant in the meeting.
You can take notes during the meeting by selecting the meeting tab:
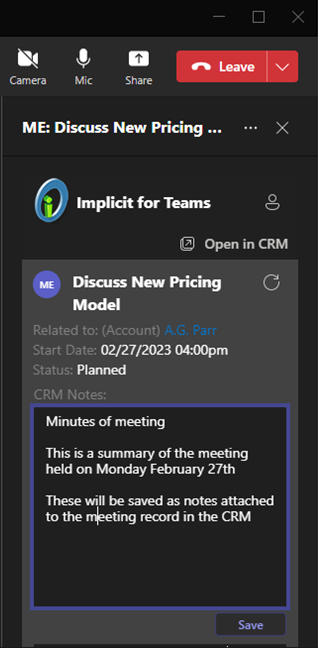
Clicking ‘Save’ saves the notes you’ve taken during the meeting as a Note in the CRM attached to the meetings record.
Adding Implicit Tabs when Scheduling a Meeting in Outlook
If you are using Implicit FrontEnd for Outlook to schedule meetings with customers in Outlook, You can configure FrontEnd to automatically add the Implicit Tabs to the meeting in Teams.
You can configure this option under the “Teams Meetings” options in FrontEnd:

When scheduling the meeting in Outlook, you are prompted to select the related record:

Upon the first sync cycle after the meeting has been scheduled in Outlook Implicit FrontEnd will add the meeting record and its related record as tabs in Teams meeting.
Automatic Retrieval of Meeting Transcripts, Recording and Attendance Report
Automatic retrieval of meetings’ transcripts, links to recordings and attendance reports requires you to use Implicit FrontEnd for Outlook. Use FrontEnd “Teams Meetings” options to configure this feature and select which type of meetings this should apply to. You can exclude the following types of meetings:
- Meetings that are marked as private.
- Meetings that are internal-only (all participants have the same domain name as the organizer).
- Meetings that do not include any CRM contacts or leads.
Note: Please be aware that these exclusions only apply to meetings that you’ve scheduled, and you are the organizer. If you want to apply these policies across the organization, make sure to publish this configuration centrally via the CRM server so they apply to all users.
The transcripts are saved in the CRM as a note attached to the meeting:
